One of the greatest features of ZFS is snapshots costing cheaper than peanuts. These open up massive backup possibilities. Furthermore, ZFS—as a filesystem developed by Sun—reminds us of the futility of keeping backups on the same machine and offers the zfs send and zfs receive commands.
ZFS Snapshots
A snapshot here means the current image of a filesystem. You are literally taking its photograph. From a backup perspective, it guarantees that these files will not change while you are copying them. Especially on a live (in-use) system, a change occurring in the filesystem from another source during the backup process can spell disaster.
Another use is to back up filesystems periodically (even if you don’t copy them elsewhere). In this way, much like Apple’s Time Machine, you can keep backups for every hour of the last day, every day of the last week, and every week of the last month, allowing you to say, “show me the state from last Saturday.”
Then there is cloning. You can take a snapshot of a ZFS filesystem and clone it to another location. You can use this in virtualization or for testing purposes.
I mentioned that snapshots in ZFS are practically free. Due to ZFS’s technical structure (for the curious, because it is a COW filesystem), these snapshots are taken instantly and do not occupy extra space. You only continue to occupy space equal to the data you add after the moment you take the snapshot. Like this:
Let’s say on Monday morning you took a snapshot of a dataset with 100GB of data. The sum of your filesystem and the snapshot’s occupied space is 100GB.
Throughout Monday, you added 5GB more data. Your total occupied space is 105GB.
On Tuesday morning, you took another snapshot. Your total space is still 105GB. Today you added 10GB more, making it 115GB.
On Wednesday, Thursday, and Friday, you added an average of 10GB of data per day and took a snapshot every morning.
As of Friday evening, you can return to any moment from the first snapshot of the week to the last, and they are all preserved. But the total area occupied by these 5 backups is 145GB.
If you had done this by manually copying the backup every day, your total space would have been 545GB.
To take a snapshot of a ZFS partition, you use the “@” symbol. Write the name of the dataset you want to back up, put an @ sign at the end, and enter the name that defines your snapshot.
zfs snapshot tank/home@pazartesigunu
This “pazartesigunu” (Monday) is the definition of your snapshot. I prefer to provide the date and time of the day, starting from the year in a combined format. If I were taking a snapshot as I wrote this sentence, I would write 201808051113; 05.08.2018 at 11:13. I don’t write it manually anyway; I handle it with the date command in Linux.
So, how long does this snapshot process take? Let’s take a snapshot of a dataset with more than 110GB of data—actually, the root dataset of the pool.
…then, unable to stop myself, I snapshotted all my datasets. There is no acceleration in the video. Snapshots are really taken at this speed. Now add this command (with a little modification) to your scheduled tasks (via crontab). Congratulations on your automatic backup system.
You destroy snapshots just like you delete datasets; with zfs destroy . To destroy the snapshot from the previous command example:
zfs destroy tank/home@pazartesigunu
So what will you do when you want to return to a snapshot? First, get a list of your snapshots:
zfs list -t snapshot
This brings up the snapshots for the entire pool. To list the snapshots of a specific dataset, use the -r flag as well.
zfs list -r -t snapshot tank/home
Now you are ready to return to a previous snapshot:
zfs rollback tank/home@pazartesigunu
Just like a time machine, you have returned to the Monday state of your data.
This return process has limitations. You can only return to the latest snapshot. That is, to return to an older one, you must delete the other snapshots in between. If this seems strange to you, remember the Back to the Future series. Going back to the past in time created a break in the timeline and an alternative timeline. 🙂 So it makes sense for it to be like this. Other than that, naturally, you cannot edit a snapshot. Since snapshots are treated as sub-datasets of the dataset you took them from, you cannot delete that dataset without also deleting the snapshots.
ZFS Cloning
Cloning brings a solution to the situation in the previous paragraph. By “cloning” any snapshot, you can use it as if it were a separate filesystem. After cloning, adding or removing files is permitted.
zfs clone tank/home@pazartesigunu tank/pazartesihome
The Monday state of your home dataset is now ready for your use under the name tank/pazartesihome. Your purpose for doing this isn’t just to gain write access to that snapshot. Actually, the more useful purpose of clones is to quickly create test systems or recreate the current state of a live system in a test system. Thus, it helps you take quick precautions against software errors caused by differences between your test system and your live system.
Clones, unlike snapshots, are treated as normal datasets. This includes the space they occupy; you can take a clone of an operating system, and as long as you don’t open that clone and add things to it, it doesn’t occupy extra space. The only requirement for a clone is that you cannot delete the snapshot that is the root of this clone.
ZFS Sending and Receiving (send and receive)
There is no sense in keeping backups on the machine you are backing up. These need to be copied somewhere. This is where the zfs send and zfs receive commands come into play.
With the zfs send command, you can send everything in your pool (together or separately) to other places. The reason I wrote the word “places” in bold and emphasized is to express the flexibility of the command.
The reason for this flexibility is that ZFS creates a perfectly ordinary data stream with the send command. Its target can be anywhere; you can save it to a file if you want, you can give it as input to another command if you want, or you can use it jointly with the zfs receive command as you will see shortly.
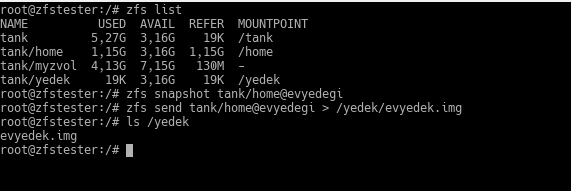
Before using the zfs send command, you need to take a snapshot—you cannot send a live dataset with send, and there is no point in doing such a thing anyway. Let’s take a backup of a dataset on our veteran zfstester system and send it somewhere.
zfs snapshot tank/home@evyedegi zfs send tank/home@evyedegi > /yedek/evyedek.img
This evyedek.img file is the same thing as the image of any filesystem. You know how you take an image of a Windows disk with an “imaging program”? Think of doing that without shutting down the system.
Well, if this is an ordinary data stream, we can compress it too?
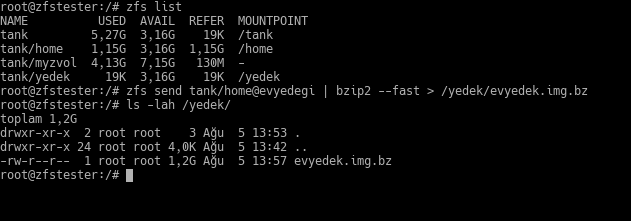
I noticed later that the compressed file was larger than the original; the reason is that that area already had a structure that is difficult to compress. Not every file compresses. 🙂 It won’t be like this in real life.
Anyway. The place we put this evyedek (home backup) file can be our own disk, another disk in the system, storage connected via USB, a Windows share on another machine on the network… Anywhere works.
The zfs receive command is the exact opposite of send; it takes any stream and creates it as a dataset in our ZFS pool. We could include the image file from the first zfs send example into our ZFS pool like this:
zfs receive tank/uzaktangelen < /yedek/evyedek.img
Combining these two commands puts ZFS into a demigod position in a robust data center where you will take regular backups.
zfs send home@evyedegi | ssh root@192.168.122.1 “zfs receive trantortank/zfstesterevyedegi”
Below, we are running this command on our source machine.
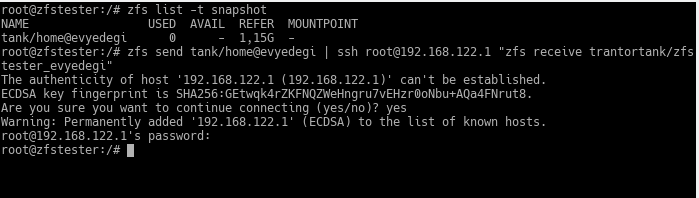
And this is the ZFS pool located on the machine on the other side (on trantor).

With the simplicity of this command, taking regular backups to a location physically separate from your data center becomes very easy. As I mentioned before, write a script that takes regular daily snapshots on your systems. Then, organize this command a bit (with matters like SSH certificate entry) and put them both into scheduled tasks. Let your system take its backups regularly and transfer them to your secure backup unit at a remote location at midnight. You can even compress and encrypt them in between since you are sending them over the network. All in a mere two lines of command.