In the third part of the series, we will dive into the details of ZFS data security and try to trigger some potential data loss scenarios. Fasten your seatbelts. 🙂
Other articles in the series
ZFS series vol. 1: The ZFS approach to data storage
ZFS series vol. 2: ZFS installation and preparing for play
ZFS series vol. 3: Trying to break ZFS (You are here)
Data loss scenarios with RAIDZ
We left off with RAIDZ-1 in the previous article, so let’s use that.

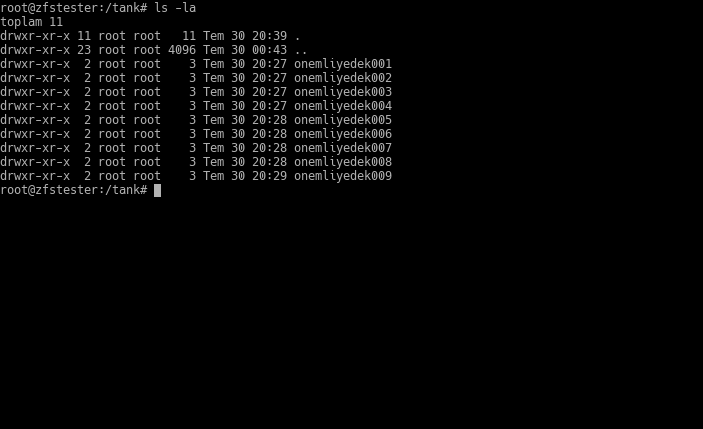
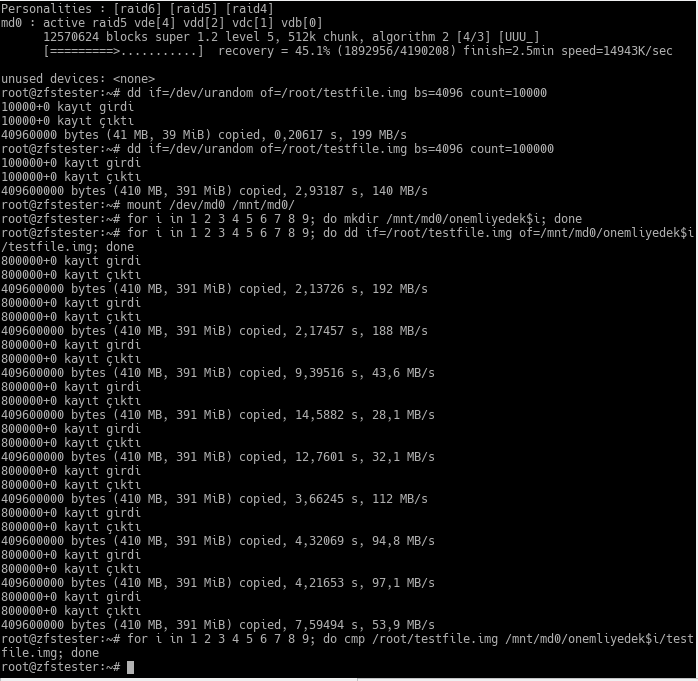
I created 9 directories under our ZFS partition, now accessible at the /tank directory, and placed a 400MB file in each. It doesn’t matter what these are, but let’s assume they are data you don’t want to lose. 🙂
Let’s say disk number 2 (virtio-zfsdisk2) died.
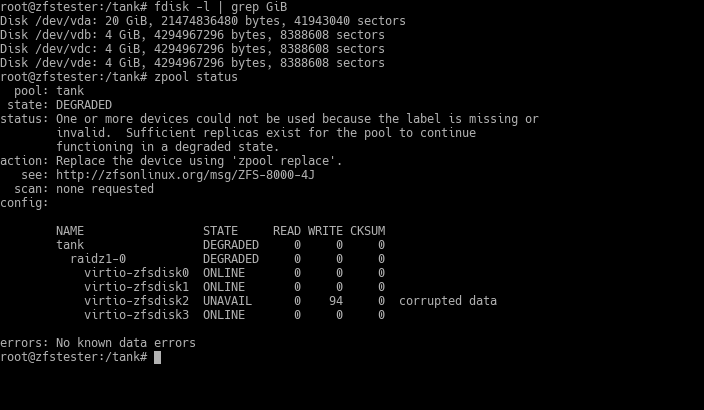
ZFS detects this within a few minutes and moves the pool to a “DEGRADED” state. So, what happened to the data?
It’s safe. Your pool continues to function this way; there is no interruption in service. However, RAIDZ-1 cannot withstand a second disk failure. It is in our best interest to attach a new disk as quickly as possible.
I’m going to pull a little trick here. As I mentioned in previous posts, I am running this ZFS series on a virtual machine. All these “disks” are actually just files on the host machine where the virtual machine is running. The following screenshot is from the terminal of that host, showing a list of files I’ve presented as disks to the zfstester machine:
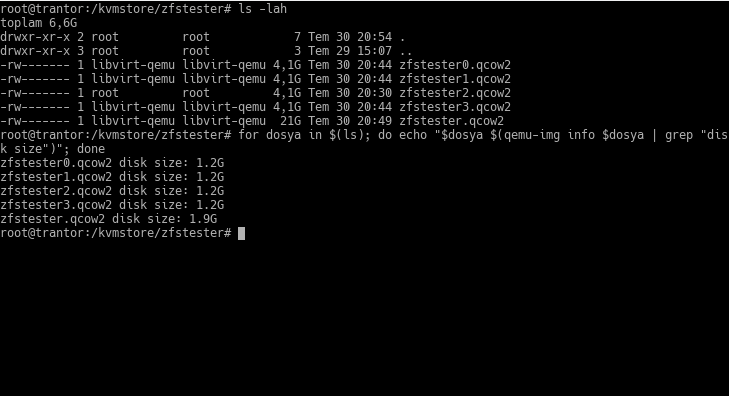
The files from zfstester0.qcow2 to zfstester3.qcow2 represent the 4GB disks on the zfstester machine—remember when I said “I made them 4GB, but you should assume they are 4TB”? Those are the ones. The zfstester.qcow2 file is the disk where that virtual machine’s operating system resides.
The feature of this qcow2 format is that it only takes up as much space as the data put into it, unless we specify otherwise. When we get the file list, it reports a “virtual size” to us. In our example, it’s 4GB. However, the space it actually occupies is only as much as the amount of data inside.
Let’s create the disk we will add to our zfstester system—that is, the file on the host—and look at its size:
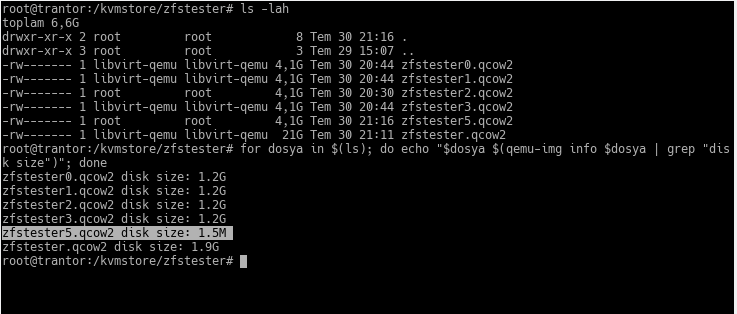
I accidentally named the friend zfstester5. 🙂 In the output of the ls command, its virtual size appears as 4GB. In reality, the space it occupies is 1.5 MB. We haven’t put data in it yet; as ZFS reconstructs it using information from the other disks, it will grow. But just like the others, it will stay around 1.2GB.
Next, we need to show this to our zfstester system and place it into our ZFS VDEV using the zpool replace command, as instructed in the output of our zpool status command.
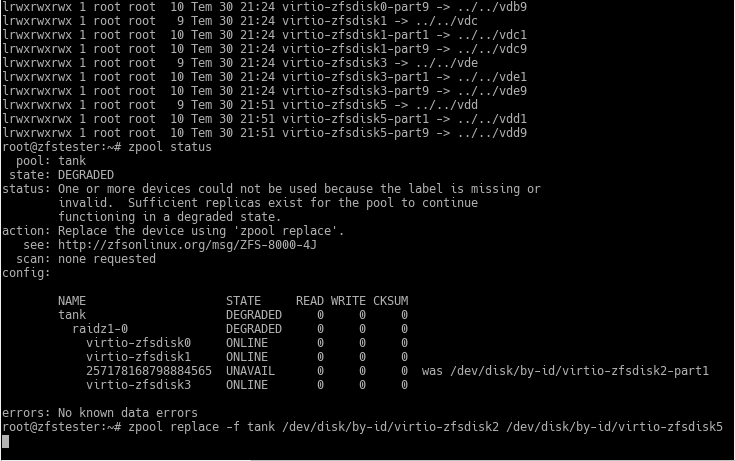
In the upper part of the screenshot, I looked at the contents of the /dev/disk/by-id directory, but the command scrolled off-screen. With real disks on a real computer, this area will show an identifier like a serial number.
My command to replace the disk in the ZFS pool was:
zpool replace -f tank /dev/disk/by-id/virtio-zfsdisk2 /dev/disk/by-id/virtio-zfsdisk5
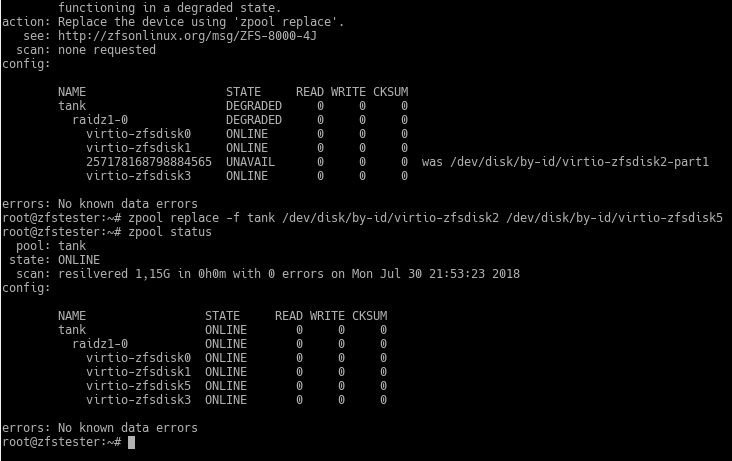
Don’t mind the length of the command; it turned out this way because I wanted to use the disk ID. The command took less time than I expected, so there are no details, but let’s just say it’s quick. 🙂 You see the term “resilvered” in the command output. This is the name given to the process of preparing a disk that has been swapped in for one removed due to failure, by copying data from the other disks.
Now, let’s try a situation where the disk is not broken, but the data is corrupted for some reason. To do this, I wrote random data from /dev/random to some parts of one of the disks in the pool. Normally, you wouldn’t encounter this type of situation; at most, you’d get a bit error. I essentially started from somewhere on the disk and continued arbitrarily until I pressed Ctrl+C. I might have corrupted the data on the entire disk. 🙂
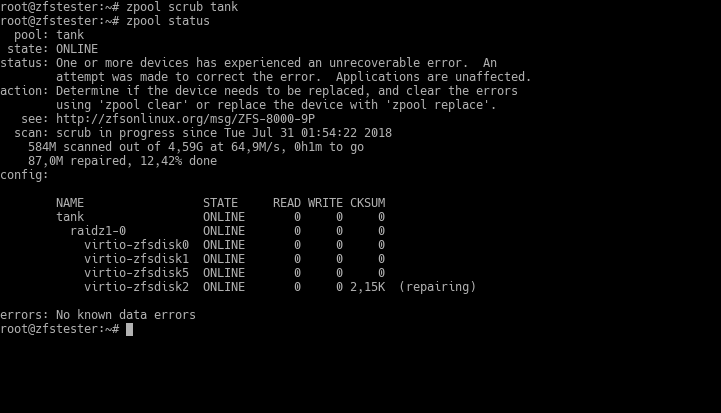
The command ZFS uses for these types of data faults is scrub. I ran it after intentionally creating my artificial error and immediately followed up with zpool status to observe the situation. ZFS quickly detected the data error on the disk and began correcting it.
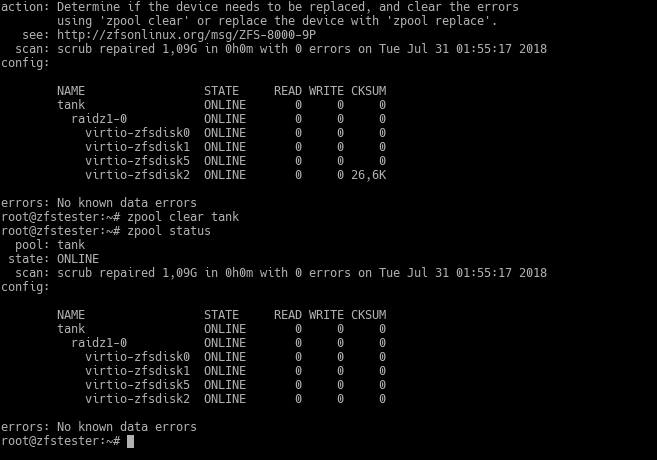
It is impossible for ZFS to know the source of this disk error. It might not be practical for us to find it either. Therefore, ZFS warns us, saying “either replace the disk to be safe or check and clear the error.” This warning will persist until you clear the error with the zpool clear command. After clearing it, it continues to work as if nothing ever happened.
Try these with RAID, tough guy!
I explained earlier why I preferred ZFS over RAID; now it’s time for the practical experiments. I tried the things I tested in ZFS up to this point by setting up a RAID5 array as well.
The test preparation I did above is as follows:
- First, I created a 4-disk RAID5 array and checked it.
- Then, I created a 400MB file consisting of random bytes in the root user’s home. I missed a zero in the first command; I’m fixing it in the second.
- In my new RAID5 array, I created folders as in the ZFS example and placed a copy of the first file I created into each.
- Finally, I compared all these copies byte-by-byte with the original file. No difference; the copies are correct.
The first action was to remove a disk from this system and insert a new, empty disk. As we would expect, this didn’t cause a problem; RAID5 successfully “rebuilt” the newly inserted disk.
It rebuilt it, sure, but it took significantly longer than ZFS? The reason is that RAID recovers data by copying the disk starting from the very beginning to the very end. To demonstrate this, I replaced all the disks in the RAID array one by one and allowed them to be repaired. Here is the result on the main (host) machine where I’m doing the virtualization:
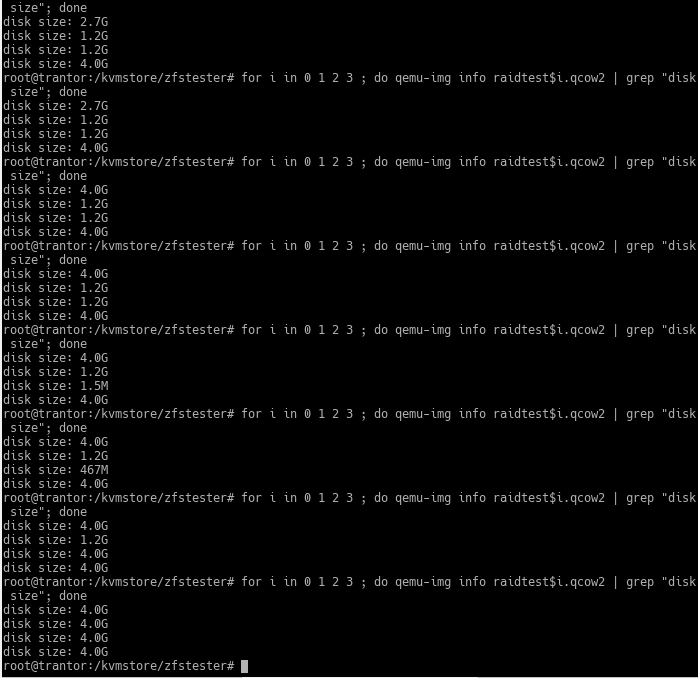
You can easily tell where the new disk is by its size. The 1.5MB one is the new one. When the RAID system starts filling it, its size increases. However, because RAID doesn’t copy the actually recorded data but the disk it sees, and the virtual disk size visible to it is 4GB, the size of the new disk file grows completely.
After replacing all four disks in sequence, they all start occupying 4GB of space even though the amount of data inside hasn’t changed. This means I transferred 16GB of data to recover from 4 disk failures. During this time, you can say whatever short prayers you know so that another disk doesn’t fail. With real-life disks of 4TB and above, you’d be reciting the whole scripture.
We were also going to simulate silent data corruption; I chose one of the virtual disks in our RAID array as a victim and wrote cute little random bytes over it. In the example, the victim disk’s name is /dev/vde. RAID naturally didn’t notice this. As a result, three files ended up in a different state than the others.
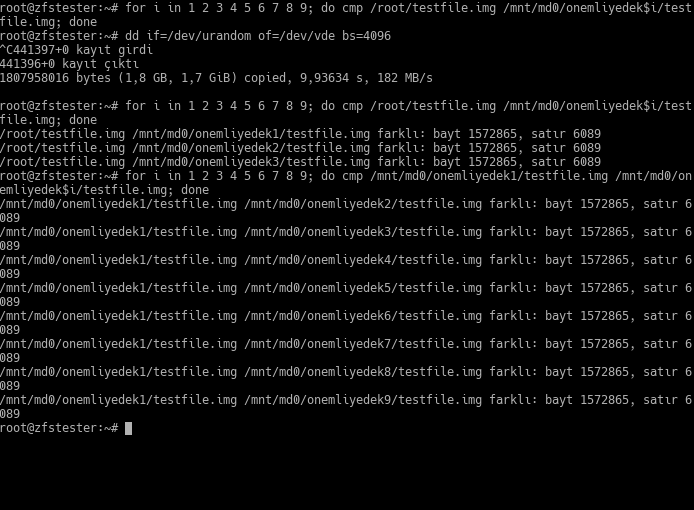
Then, I went one step further: I removed one of the healthy, non-corrupted disks and replaced it with a new, empty one. RAID transferred the data to this empty disk. But it did it wrong! Now all my files are different from each other. In other words, all my files are corrupted.
Now you might say, “we’ve been doing RAID for years and nothing happened.” That’s because you used to deal with small disks. Also, luck was on your side, and you convinced your managers to buy expensive storage systems. Let me summarize point by point:
- The purpose of RAID is to prevent data loss caused by a disk dying completely.
- RAID does not protect against “silent” data errors where the entire disk doesn’t die or give an error.
- When a disk fails and is replaced in RAID, the reconfiguration happens from the beginning of the disk to the end. For this reason:
- Extreme load is placed on the other disks in the RAID array. In some cases, this load can exceed the design specifications of those disks. That is, the likelihood of other disks failing increases throughout the RAID reconfiguration.
- Because the time it takes to reconfigure the array is extended, the probability of other disks failing rises even further.
This post alone is actually reason enough to use ZFS. As a note, let me state that RAID5 is no longer recommended. Even if you are going to use RAID, don’t use RAID5-6 etc.; use RAID10 (RAID0+1).
Which ZFS topology should we use?
In the previous post, I showed mirrored and RAIDZ topologies; in this post, I explained how it works via RAIDZ with examples. Here is my preference list:
- I don’t really want to use RAIDZ1, and I haven’t used it so far. The reason is that the probability of data loss upon a second disk failure is 100%. If it’s going to be RAIDZ, it should be RAIDZ2 or 3.
- I prefer the mirrored configuration for systems with up to 4-6 disks. I believe I have a chance during second and further level disk losses in exchange for a reasonable storage capacity ratio. Also, resilvering tasks are fast.
- From 8 disks onwards, I find RAIDZ2 worth considering. We can assume the reason for such a system’s existence is storage. Well, the disk space in the chassis and the number of SATA/SAS slots on the motherboard might be limited. Again, the priority is the mirrored configuration; if its storage density isn’t sufficient, then RAIDZ2.
- I haven’t considered RAIDZ3 until now. Perhaps it’s because I haven’t entered such large storage sizes yet. But as these RAIDZ levels progress, disk resilvering times increase exponentially, not linearly.