Now, let’s get ready to install ZFS and start tinkering. In this article, I will perform a ZFS installation on a basic system and discuss core concepts as we create storage pools. Beyond the installation, you will see concepts like ZFS pools, VDEVs, mirroring, and RAIDZ. With this article alone, you can dive headfirst into using ZFS.
Other articles in the series
ZFS series vol. 1: The ZFS approach to data storage
ZFS series vol. 2: ZFS installation and preparing for play (You are here)
System and ZFS Installation
I am conducting these experiments on a virtual machine created under KVM. I’ll be working on Debian Linux Stretch (9.x), which I use daily. This will largely hold true for Debian and Ubuntu; if anyone asks about other distributions, we’ll find a guide. 🙂 For Linux, we use ZFSOnLinux. It doesn’t have every single ZFS feature yet, but it has everything we’ll need, and that’s enough.
I’m adding 4GB disks to the virtual machine—because I have 1TB of storage on this test system. In real-life physical servers, you can think of these as 4TB. So, I have a total of 16GB in the test system; in a hypotetical server with 4x4TB disks, your total space would be 16TB. Of course, how much of that 16GB I actually get to use will depend on the configuration, and you’ll find those details in their respective sections.
To start, download the Debian net install file. If you’re installing on a virtual machine, you can use it as is; otherwise, you’ll burn it to a USB disk. For Windows users, I can suggest a tool like Rufus. The Linux crowd will already find the necessary dd command on their systems:
ATTENTION: The /dev/sdX in this command represents the USB flash drive. You must write whatever your flash drive’s node point is, such as sdd or sdc. The device you provide to this command will be wiped and replaced with Debian installation files—be careful.
dd if=/home/emirhan/Downloads/debian-9.5.0-amd64-netinst.iso of=/dev/sdX bs=4096
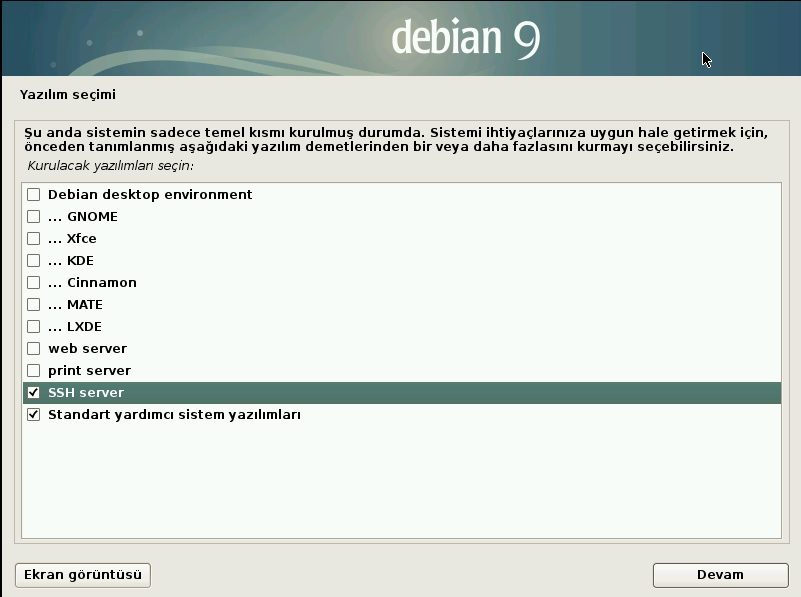
You can choose to install a graphical interface with net-install, but it’s not necessary. I suggested this both for quick testing and to keep things clutter-free. Also, if you’re setting up a serious system, you can still start with this small, simple installation and progress to a machine where you only install what you actually need. My selection is as follows:
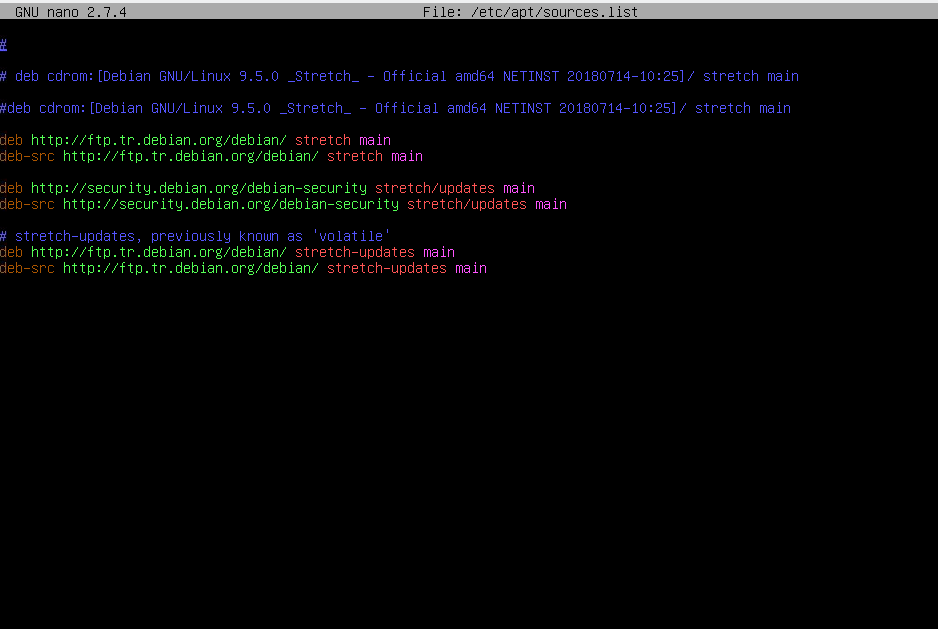
Follow the prompts to complete the system installation for testing purposes. Now, it’s time to install ZFS. The necessary installation packages for Debian Stretch are in the contrib repository. This repository isn’t enabled by default. To enable it, open the /etc/apt/sources.list file. The text editor nano should be installed by default; you can open it with:
nano /etc/apt/sources.list
Change it from this:
To this:
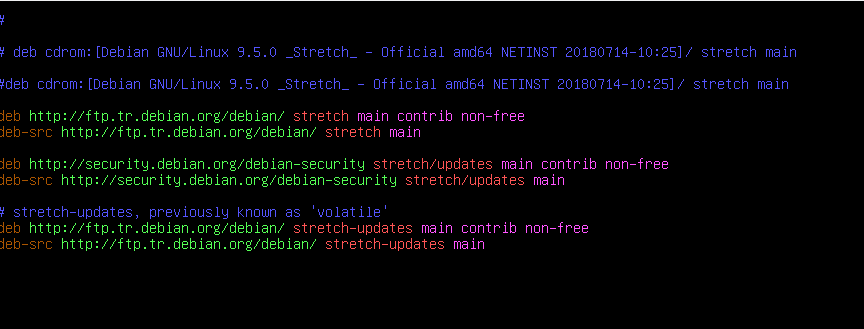
You can exit the Nano editor with Ctrl+X; it will ask to save before exiting. Then, update the package repository info with the apt-get update command. In addition, it’s not strictly necessary on a net-install, but it’s a good habit to update the system while you’re updating the Apt repos anyway.
Now, roll up your sleeves again and execute the following three commands in order:
apt-get install linux-headers-$(uname -r)
apt-get install zfs-dkms zfsutils-linux zfs-initramfs
modprobe zfs
With these commands, you are installing the following. You’ll notice other packages being installed too; the Debian package management system identifies dependencies for the packages we specified and adds them automatically. Also, you will receive a “license incompatibility” notification. This is not a system incompatibility; you can just confirm and move on. To the curious: Debian and ZFS are distributed with different licenses, and adding ZFS means what you now have may not adhere to Debian licensing terms. We’re good in terms of both licenses for a homelab, so no need to worry. If you want to know more, here is Debian licensing and this one is zfsonlinux licensing page at the time of writing this article.
- linux-headers-$(uname -r):** The $(uname -r)\ part gives the currently running kernel. That’s the format for the package name in Debian. C programmers might find this familiar; since the ZFS module will be compiled from source code, the kernel header files must be present on the system.
- zfs-dkms: The thing that does the heavy lifting: the ZFS module added to the kernel. This will take a bit of time as it compiles from source.
- zfsutils-linux: How do we manage ZFS? With the software in this package!
- zfs-initramfs: We won’t have much to do with this in this series, but I included it in case you want to boot the system from a ZFS partition later.
The last command loads and activates the ZFS module on the system. Now you’re ready to do somersaults with ZFS. Seriously. 🙂
ZFS Building Blocks: Pools and VDEVs
Storage management with ZFS is handled at the top level with pools. ZFS offers you storage “pools.” In your daily life, you don’t worry about how many disks make up these pools or which configuration they use. ZFS handles these tasks silently in the background. You can create as many pools as you want on your system. In this series, we will use a single pool. Its name will be tank (as I’ve seen it named everywhere I learned ZFS). Not the kind with treads, but like an aquarium tank. 🙂 You can name it whatever you like.
Tip: Later, I’ll mention exporting and importing ZFS pools; as you’ll see there, it’s possible to move a ZFS pool from one system to another. Therefore, don’t use the same pool names across all your systems. If possible, use unique pool names that include the system name. For example, the name of the system I set up for these articles is zfstester, so I could call the pool zfstestertank0 (anticipating the possibility of multiple pools). If you are using this on a dense environment, you’ll of course adhere to your org’s naming scheme.
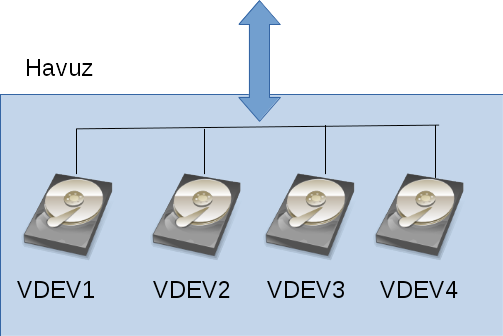
The building blocks of these pools are VDEVs. Used for “Virtual DEVice,” this term describes the disks or disk groups that will be combined into a ZFS pool. You can get incredibly flexible here. Examples of scenarios for 4 disks (none recommended except one):
- Each of the 4 disks is a separate VDEV: The total space of the ZFS pool becomes the sum of the four disks. When you check, you see 4 separate VDEVs.
- “Mirrored” groups of two: Each pair of disks is a copy of the other (mirrored), appearing as two VDEVs. Each VDEV consists of two disks. The pool capacity is equal to 2 disks.
- Two disks are mirrors of each other, the other two are separate VDEVs: The first two disks are treated as a “group” and seen as a single VDEV. The other two become two separate VDEVs. You end up with 3 VDEVs, and the total pool capacity is equal to 3 disks.
Visually, you can see the first example in the drawing below.
And the second example is this:

ZFS “stripes” the data it writes across all VDEVs; it applies the Striping method (in a smarter way) familiar to those who know RAID terminology. If one VDEV is larger than another, it’s not a problem for ZFS; part of the data can be held on VDEVs as striped, and the rest as unstriped.
By the way, the disks in a ZFS pool don’t necessarily have to be physical hard drives. It can be anything used as a block storage device in Linux; mechanical disks, SSDs, a block device from a SAN, USB, or even a file.
Creating Our First Pool
When we set up the system, our storage status is as follows:
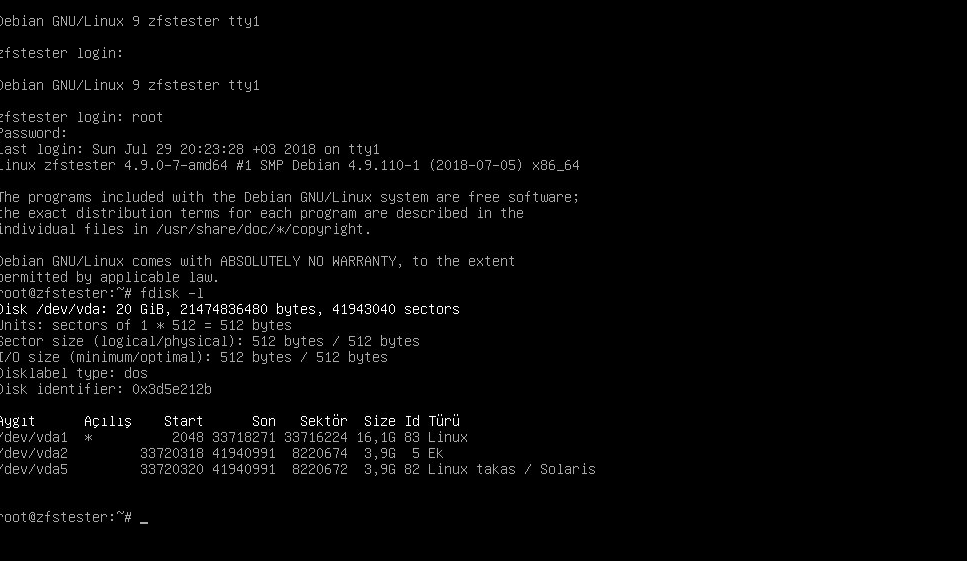
We only have the disk where we installed the system. Its name is vda; /dev/vda. Let’s attach four 4GB disks to it:
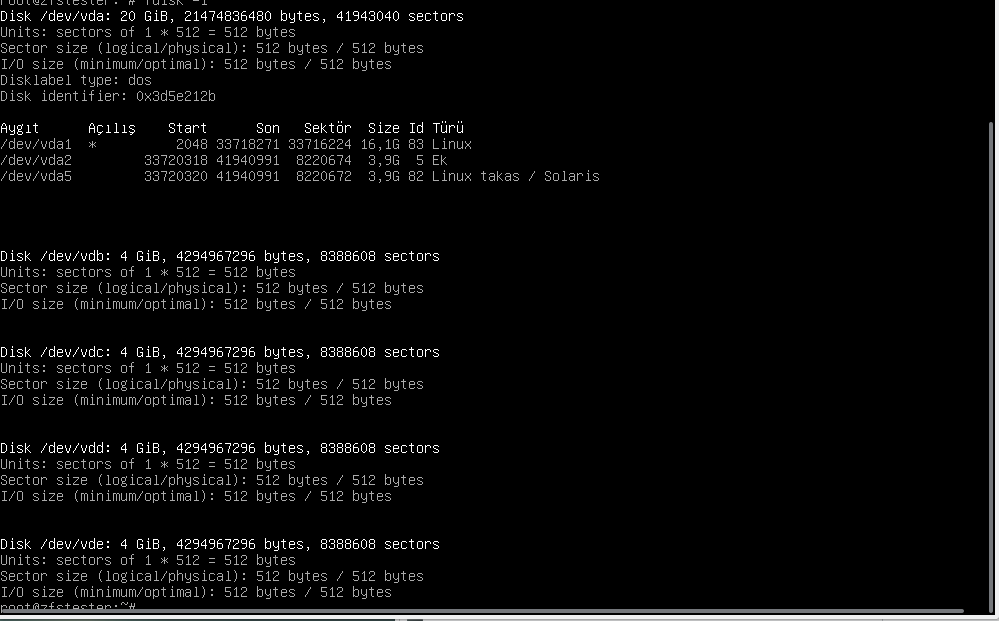
Our new disks arrived as vdb, vdc, vdd, and vde. If this were a physical machine, these could be hot-plug —meaning they would be attached to the system without shutting down the server, which is the preferred mode of operation, but not all end-user computer support this reliably.
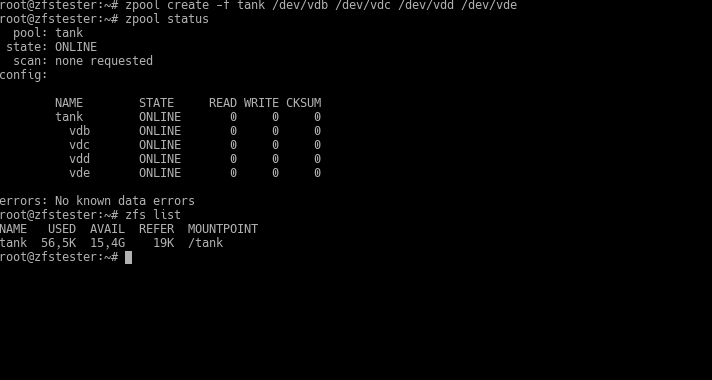
Now, we create a pool named tank. Let’s create this pool as 4 VDEVs, each consisting of one disk. In ZFS, we use the zpool command for pool-related tasks and the zfs command for dataset/filesystem-related tasks. Since our task now is with the pool, our command is zpool.
zpool create -f tank /dev/vdb /dev/vdc /dev/vdd /dev/vde
To get information about our pool, we use the zpool status command.
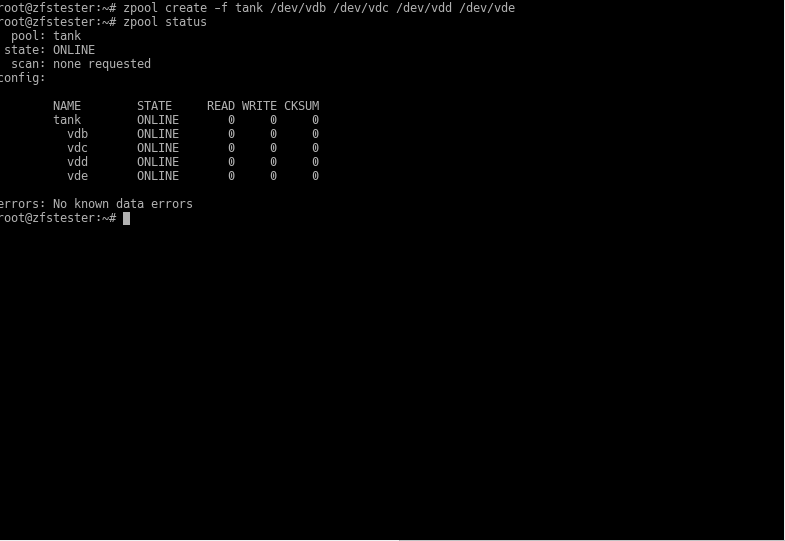
Ta-daaa: we’ve created our first pool called tank. Did I mention ZFS commands are very simple? We used the -f parameter to say, “The disks are empty, honey; there’s no table or anything, don’t give me an error.” Then we gave our storage pool whatever name we wanted. Following that, we listed the disks to be included in the pool one by one.
So, where is this tank?
It’s mounted to the root file system as /tank, ready for your commands. Pools you create with ZFS are mounted to the root file system this way. Now, you can create folders inside it or create sub-filesystems as you wish. We’ll get to that, be patient.
Now, notice that the size of this pool is equal to the total size of the 4 disks: 16GB. The problem with this type of configuration is that you are using very few of ZFS’s data protection features. If a disk dies, you lose data.
So, let’s move to the second type of configuration. Let the disks be copies of each other in pairs. In the next screenshot, I run these commands in succession:
zpool destroy tank (let’s destroy the previous pool)
zpool create -f tank mirror /dev/vdb /dev/vdc mirror /dev/vdd /dev/vde (create a new one in pairs)
zpool status (let’s look at the pool status)
zfs list (What happened to the total capacity?)
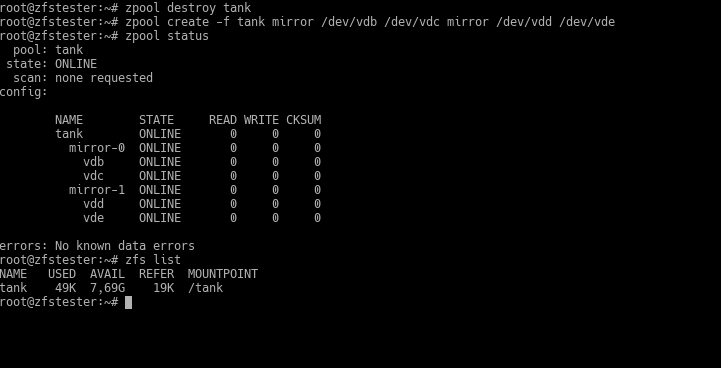
First, look at the output of the zpool status command. It created two VDEVs: mirror-0 and mirror-1. These VDEVs are groups consisting of two disks each. Under them, there’s vdb and vdc for mirror-0, and vdd and vde for mirror-1.
In these disk groups, vdb and vdc are copies of each other. Similarly, vdd and vde are copies of each other. In such a configuration, ZFS can provide its famous high-level security. If one of these fails, data is transferred from the healthy copy to the disk you replace it with. Beyond total disk failure, even if there’s a single-bit data error while the disk is still running, ZFS can catch this and correct it from the healthy copy. Even in a data error scenario, there could be errors on both vdb and vdc, provided they are on different blocks. Since ZFS knows which data block is faulty, it corrects the faulty one on vdb using vdc, and the faulty one on vdc using vdb.
Everything is great in this topology, but the total disk space became half of the first one? Here, in the RAID world, people would gravitate toward RAID5. In ZFS, we look at the RAIDZ topology. Let’s destroy the pool like before and try the RAIDZ configuration this time.
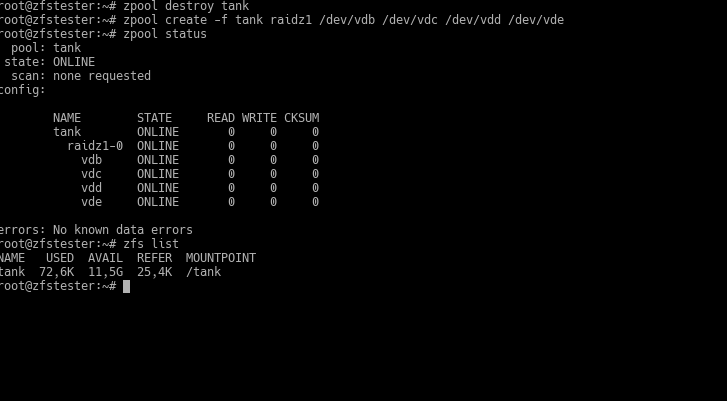
The keyword here is raidz1. Unlike the previous two configurations, a single VDEV was created, and it came as RAIDZ1. This topology is a “parity-based” configuration like RAID-5. I won’t dive into the depths of this topic for now. Note the storage area: 12GB.
For RAIDZ, there are two other levels besides RAIDZ1: RAIDZ2 and RAIDZ3. These are simply configurations resistant to 2 disks failing and 3 disks failing, respectively.
Now, let’s compare these three configurations in terms of data security and capacity:
- Each disk as a VDEV: We reach the highest disk space. However, here we have no chance of correction against data corruption.
- Mirrored pairs: we get storage space equal to (capacity of one disk) * (number of disks) / 2. This configuration experiences no data loss when a single disk fails. In fact, it loses no data even if a disk in the other VDEV fails before the first one is replaced.
- RAIDZ1: If we call the number of disks n, it provides storage space equal to (single disk capacity) * (n-1) and again provides security against data loss in case one disk fails.
So, which one should you choose? It depends entirely on your expected disk space density, fault tolerance, and the number of disks. If we had 8 disks instead of 4:
- Making VDEVs from separate disks would give us 32GB of disk space.
- With mirroring, we would have 16GB of disk space.
- 28GB is possible with RAIDZ1.
- 24GB with RAIDZ2.
- 20GB with RAIDZ3.
Honestly, I don’t like parity-based configurations much anymore. Even if you use configurations that provide security against disk failure, you wait with the skittishness of a stray kitten in the rain until a failed disk is replaced and ready. What if another one pops before that disk is ready? Did I buy these from the same batch? 10 years ago, maybe my disks were 1TB each, meaning if a disk popped, I’d have to copy at most 1TB, but now when a disk pops, I might need to copy up to 4TB. Moreover, disk speeds haven’t reached four times the speed of 10 years ago.
Therefore, I prefer the mirrored configuration at the expense of using more disks to reach the same capacity. If nothing is stopping you, I recommend the same to you. The limiting factor there will be the number of disk connections on the server motherboard; otherwise, since there’s no worry of data loss with ZFS, you can create plenty of space with disks bought in packs of 10 on sale from a tech store.
Commands for ZFS Pool Topologies
For basic VDEV configuration, you provide disk (device) names following the keywords to the zpool command. I gave the disk names as sdb, sdc, sdd, sde to generalize. In a non-virtual system, you will likely encounter these names.
- Each disk as a separate VDEV: zpool create -f tank /dev/sdb /dev/sdc /dev/sdd /dev/sde
- Disks mirrored in pairs: zpool create -f tank mirror /dev/sdb /dev/sdc **mirror** /dev/sdd /dev/sde
- Single VDEV with RAIDZ1: zpool create -f tank raidz1 /dev/sdb /dev/sdc /dev/sdd /dev/sde
- Single VDEV with RAIDZ2: zpool create -f tank raidz2 /dev/sdb /dev/sdc /dev/sdd /dev/sde
- Unnecessary, but two mirrored and others as their own VDEVs: zpool create -f /dev/sdb /dev/sdc mirror /dev/sdd /dev/sde
Tip: Using Unique IDs (Disk Identity) in Disk Naming
In the examples, we used vdb, vdc. You will see names like sda, sdb, sdc on a real computer. It doesn’t matter. What matters is that these device names can change. The system names them according to what comes from the BIOS. If you add two more disks to this system and even mix up the SATA ports while doing so, our vdb and vdc might go down the drain.
To prevent this, we can address disks by their unique names.
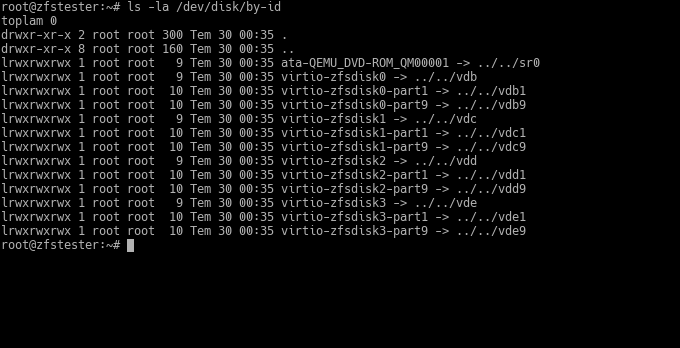
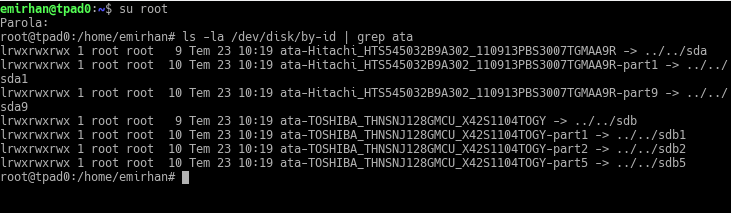
The reason for the weird names is that I entered the serial numbers of the disks I showed to the virtual machine randomly. 🙂 On a real machine, it would look something like this:
This naming won’t change. You can configure your ZFS pool directly with these names. But it will be hard to type; so, right after creating your pool, you run the following two commands (assuming the pool name is tank):
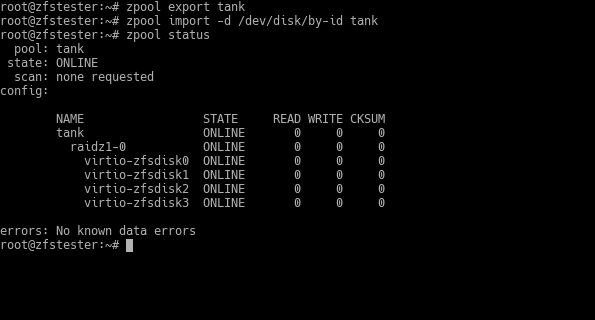
zpool export tank
zpool import -d /dev/disk/by-id tank
Thus, you first export your pool, and then you import it back using the disk IDs I provided this time.
In the next post, I will touch upon intentionally damaging disks and how ZFS recovers them. If you’ve followed the articles this far, you can start adding files to your ZFS filesystem under /tank and use it. However, since we might be deleting and recreating pools in upcoming articles, don’t do this yet on the system you’ll be practicing on. Also, using the tank’s root is not a good idea -now you have almost infinite “spaces” in the from of datasets, why not use them?